RenderDraw Documentation
  • About RenderDraw
    • What is RenderDraw?
    • RenderDraw Philosophy
    • Key features and benefits
  • Introduction
  • Getting Started with RenderDraw
    • Installation
    • Adding a RenderDraw License to a user's account
    • RenderDraw Permission Sets
      • Using user access policies for automated permission set & License Assignment
    • Relating Drawings to a Salesforce Record
    • CAD Conversion
      • Setup of CAD Conversion
      • UI CAD Conversion for Salesforce for Salesforce Admins
      • Version 1
        • CAD Conversion API (Direct Use)
          • Example input for Conversion
      • Version 2 (proposal)
        • Purpose
        • Sample File Input Conversion
  • Diving deeper
    • RenderDraw Architecture
      • RenderDraw Components
      • Storage of your Drawings
        • Connecting to your drawings
      • Supported Formats
    • Relationships
      • Why Metadata Matters
        • Advanced Metadata Relationships
          • Child Lookup
          • Parent-Child Relationships
      • Record Management
        • Scene Settings
    • Performance Considerations
    • Development Resources
    • Using Components on LWR Digital Experiences
    • Utilizing Interactions within Lightning Flow
    • Fixing Common Issues
  • Usage Scenarios
    • Use Cases
      • 2D
        • Part Finder
          • Data Setup for B2B
            • Choose where you want to display your Product Catalogs
            • Setup Field on Catalog Object
            • Setup Group and Files
          • Parse PDF Catalogs to attach images
          • Base setup for initial catalog page
            • Sharing of Files
            • Clone Pages
          • Create Callouts for Parts
          • Utilize OCR to highlight callouts
          • Optionally show inventory or availability based on data
          • Create Interactions for hover and click actions
          • Create a reusable, connected Datatable
        • Custom 2D App Development using Salesforce
        • 2D Admin Guide (Clicks, not Code)
          • Setting your object up for 2D visuals
          • Setup 2D Scene Settings for a record
          • Add a background image to your scene
          • Adding Droppable Areas and Drop Zones to a Scene
          • Adding Draggable Items to a Scene
          • Relating Components to Salesforce Data
          • Add a DataSource to a 2D scene to bind data
          • Adding Layout Drawing menu to your component (Floorplan & Spatial Drawing)
          • Linking your clicks to Actions / Flows
          • Visual Rules engine
          • Hover Actions and Popovers
          • Change your Layout Drawing visuals based on Salesforce Data in a DataSource query
          • Enable users to take snapshots
          • Show additional Drawings with your 2D Canvas
          • Use Color Selection to add clickable regions to your 2D Scene
          • Use OCR to add Clickable regions to your 2D scenes.
            • Enable Azure OCR in your Remote Site settings & Metadata
            • Add Layout Areas using OCR
        • Data interaction within a Flow
          • Modifying Canvas with APEX
        • 2D User Guide
          • Take a snapshot
      • 3D
        • Admin
          • Adding Components to your Lightning Pages
          • Examples
            • Asset Management
            • Product Visualization
            • Setup for 3D Visual Configuration Scenarios
              • Salesforce CPQ
              • Conga CPQ
              • Custom Configuration Scenarios
            • 3D Product Photography
          • Setup 3D Scene
            • Visual Scene Setup
              • Interaction Events
              • Grouping
              • Labeling
              • Actions
              • Attributes (Look & Feel)
            • Configuration
              • Interaction Events
                • Action Items
                • Conditions
                • Steps
        • Developer
          • Custom 3D App Development using Salesforce
        • End-User Usage
          • View Related 3D Converted files on a record
          • 3D Annotations & Comments
      • CAD Conversion
        • CAD Conversion using Admin UI
          • Prior to getting started...
          • CAD Conversion UI within Salesforce
        • Automatic Conversion in Salesforce
          • Integration User
          • Remote Site Setting
          • Setup Connected App
          • Setup Custom Settings for Triggering Conversion
          • Test your Files
          • Extending the integration using Platform Events
      • RenderDraw Interactive Maps
        • Admin Setup
        • End User Usage
      • Other Apps
        • RenderDraw Data Utilities
          • Essentials
            • Swiper
            • Flow Image display
            • QR Code Generator
            • QR Code Scanner
          • Standard
            • 360º Virtual Tours
              • Administration
              • Usage
            • AnnotateIt! Images
              • Admin's Guide to AnnotateIt! components
              • Permissions / Authorization
            • Standalone Datatable
          • Advanced
            • AnnotateIt! PDF Editor
            • Parsing PDFs
            • CSV Importer
        • RenderDraw for Propel
          • Initial Setup
            • Common Issues
          • CAD Conversion & Visual Viewing
          • Annotate Item Attachments
        • MeasurePro (iOS App)
          • Creating a Deep Link to Launch with Parameters
      • Interacting with RenderDraw using Lightning Messaging Service (LMS)
        • Canvas Element Hovered
        • Canvas Element Selected
        • Canvas Initialized
        • Canvas Interaction
        • Record Selected
        • Code Example of Listening to LMS Events
  • API Documentation
    • 3D Components API
      • Events (Aura)
        • EVT_Renderer_Context_Details_Closed
        • EVT_Renderer_Element_Added
        • EVT_Renderer_Get_CameraPositionandTarget
        • EVT_Renderer_Get_Hierarchy
        • EVT_Renderer_Loaded
        • EVT_Renderer_Mesh_Selected
        • EVT_Renderer_Mesh_Selection_Cleared
        • EVT_Renderer_Select_Component
        • EVT_Renderer_Screenshot_Taken
      • Components (Aura/LWC)
        • 3D Interaction Canvas (LWC)
        • 3D Advanced Renderer (Aura)
        • 3D Scene Director (Aura)
        • 3D Simple Renderer (Aura)
        • 3D File Attachment Viewer (Aura)
    • 2D Components API
      • 2D Interaction Canvas
      • 2D Scene Director
    • Universal Components Used throughout the Suite
      • dynamicContentComponent_treeGrid
    • Data Objects used throughout the Suite
      • Canvas
      • BaseCanvasItem
      • LayoutWall
      • DropZone
      • DroppableArea
  • 👬Digital Twin
    • Digital Twin App
      • Setup
        • Steps to Setup Digital Twin Capabilities
        • RenderDraw Relationship Settings
        • Visualization
      • Asset Search
      • Digital Twin LWC Component
        • Custom Component Interaction with Renderer
        • Digital Experience Tips and Tricks
Powered by GitBook
On this page
  1. Digital Twin
  2. Digital Twin App
  3. Setup

RenderDraw Relationship Settings

PreviousSteps to Setup Digital Twin CapabilitiesNextVisualization

Last updated 1 month ago

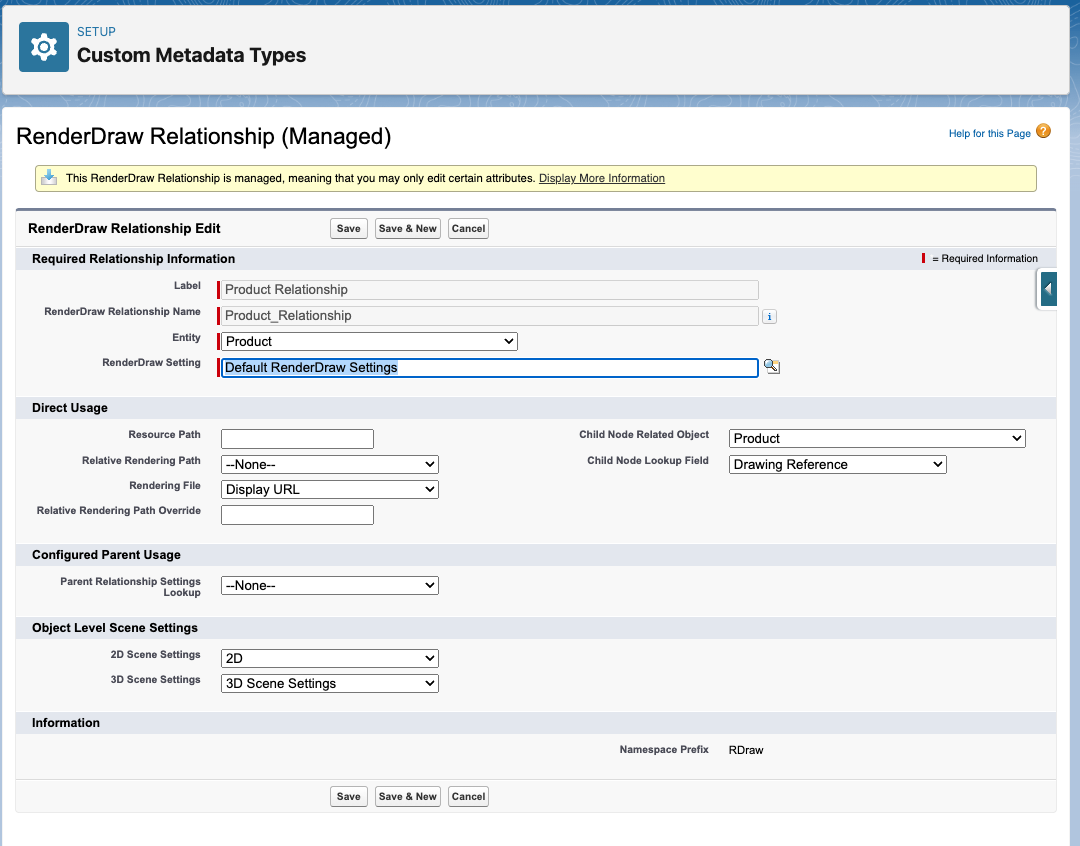
Setup a RenderDraw Relationship Custom Metadata record for the Product Object

We also set up a custom field for "Drawing Reference". We'll use this field to map the 3D elements to a given record. It was set up as a text field of 255 length.

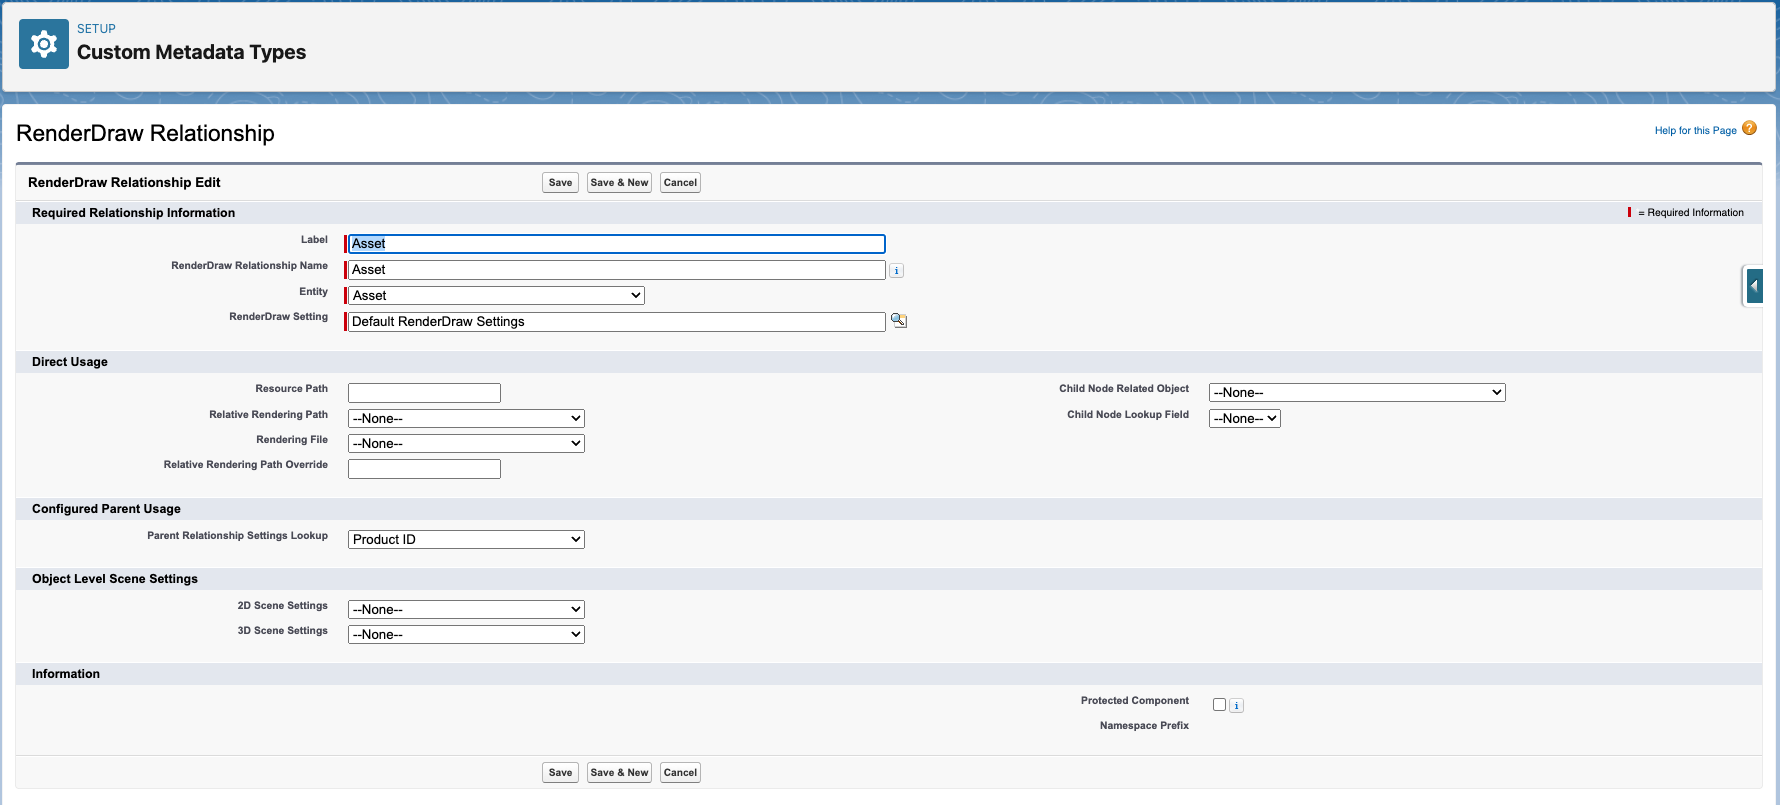
Setup a RenderDraw Relationship Custom Metadata Record for the Asset object:

This configuration will rely on the Product2 Relationship, referencing the Product Id on the Parent Relationship Settings Lookup field. We use the standard Asset object for this, and no other settings are needed, as they are controlled and provided by the parent settings on the Product Record we set up previously.

Create a relay formula field for the Asset object.

We need a way to reference what field will be used to isolate and select elements related to a record in Salesforce. Due to system limitations, we need to reference the Drawing Reference field from the Asset directly. For this, we create a new field on the Asset object as a formula field that returns text. The field is named "Drawing Reference", and will have a value of

Product2.Drawing_Reference__c

Referencing the field we created previously in a read-only way.

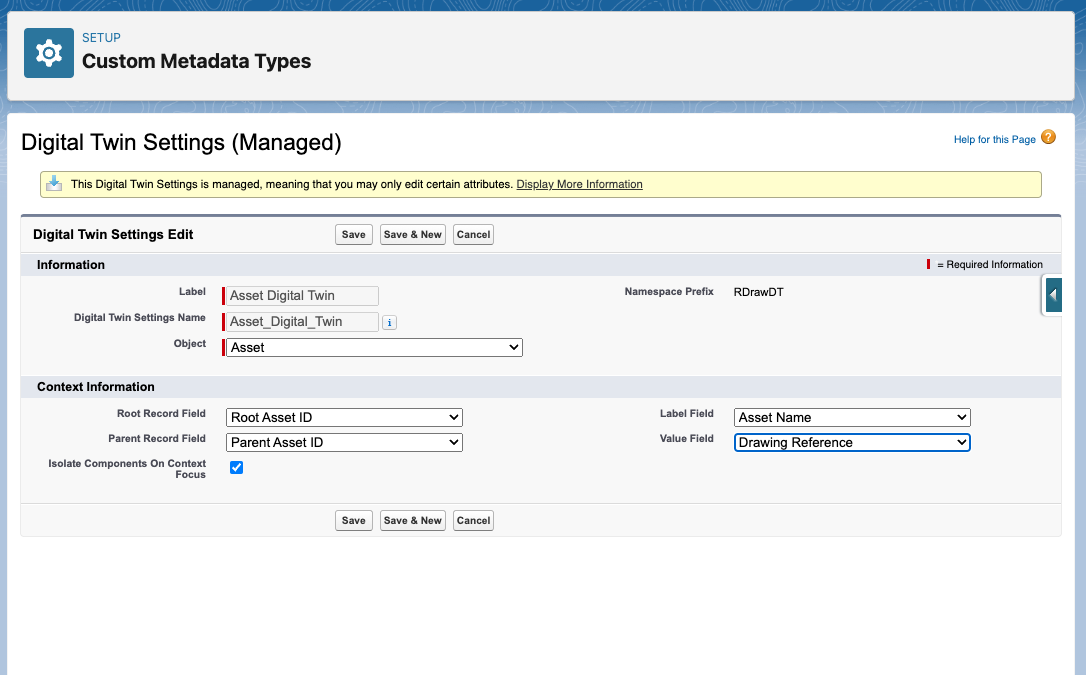
Create a Digital Twin Setting

We will edit the provided Asset Digital Twin record, and because we are using the standard Asset object, the provided fields all work out of the box.

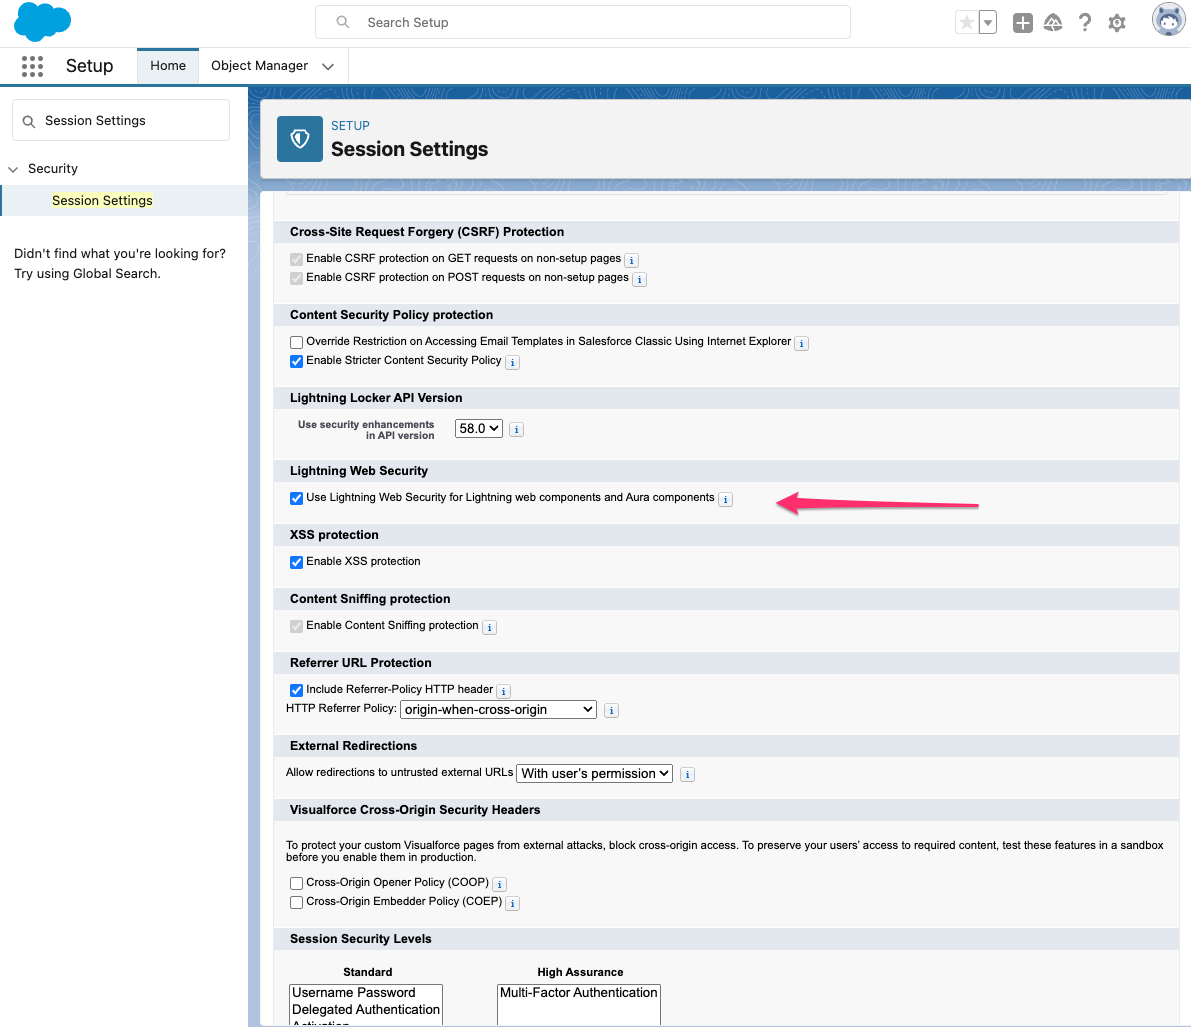
Ensure Lightning Web Security is enabled

To use the Digital Twin components, we have to enable the new Lightning Web Security so our packages can communicate

The settings are now complete for Standard visual interaction for an Asset Digital Twin visualization. If you need to extend the standard functionality you can add Digital Twin Action records

👬